Using XSD with Microsoft Visual Studio
From Code Synthesis Wiki
This page discusses various ways of integrating the XSD compiler with the Microsoft Visual Studio IDE as well as other Visual Studio-specific topics. For information on how to setup the XSD compiler and runtime library paths in Visual Studio IDE refer to the installer instructions (.msi package) or the accompanying README file (.zip package).
Contents |
Visual Studio .NET 2003 (7.1)
Note: Visual Studio 7.1 is only supported up to XSD 3.3.0. However, the mechanism described below applies to newer Visual Studio and XSD versions.
A common way of integrating the XSD compilation step into Visual Studio (VS) 7.1 is with the custom build steps. With this method you add the schema file to your project and specify the command line to compile it as well as the output files. When the project is built, VS IDE checks if the output files do not exist or out-of-date compared to the schema file and executes the specified command line in order to regenerate them. The following step-by-step instructions describe how to accomplish this:
- Add the schema file (for example, hello.xsd) to your project ("Project"->"Add Existing Item" menu action). At this point VS assumes that you are going to use the Microsoft xsd.exe tool and will try to compile the schema which may fail. This is ok. You may also find that additional files (for example, hello.h) were added under the schema item. You can safely remove them from the project.
- Open the Properties dialog for the schema file (select the schema file in the Solution Explorer and choose "Project"->"Properties" menu action).
- In the Properties dialog select the General tab and choose "Custom Build Tool" for the Tool field. Then press the Apply button.
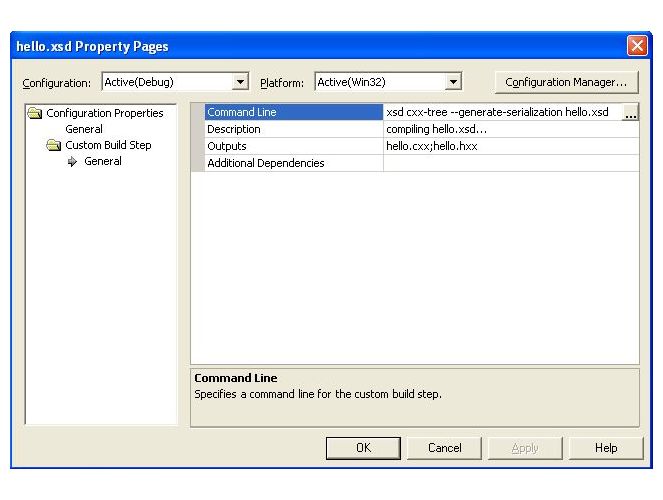
- In the same Properties dialog select the "Custom Build Step" tab. There you will have the "Command Line", "Description", "Outputs", and "Additional Dependencies" fields. Fill them depending on how you want to compile your schema, for example:
- Press the Ok button to close the Properties dialog.
- Compile the schema by selecting the schema file in the Solution Explorer and choosing "Build"->"Compile" menu action. This will result in the output files (for example, hello.hxx and hello.cxx) being created.
- Add the output files (for example, hello.hxx and hello.cxx) to the project ("Project"->"Add Existing Item" menu action).
- If your project is not linking to Xerces-C++ (or Expat, if you are using the C++/Parser mapping and have selected Expat as the underlying XML parser), you should add xerces-c_3.lib (release) or xerces-c_3D.lib (debug) (libexpat.lib for Expat) as Additional Dependencies in the Linker's Input tab. To accomplish this, select your project in Solution Explorer and choose "Project"->"Properties" menu action. Select the Linker tab, then Input sub-tab, and enter the library name into the Additional Dependencies field.

Visual Studio 2005 (8.0) and 2008 (9.0)
For Visual Studio 2005 and 2008 there are two ways to setup the XSD compilation step. You can use the same custom build step approach as in Visual Studio 2003. Additionally, starting from Visual Studio 2005, you can use the rules-based approach of setting up the XSD compilation. This method relies on the .rules files that are provided with the XSD distribution. These files specify the command line, output files, and options for the XSD compiler. They also provide the GUI-based presentation which allows you to configure the schema compilation process in a way similar to the built-in tools such as the C++ compiler and linker. The following step-by-step instructions show how to accomplish this:
- The .rules files are located in the etc\vc-8.0 and etc\vc-9.0 directories (for VS 2005 and 2008, respectively) in the XSD distribution. The first step is to add one of these directories to the list of paths where Visual Studio looks for .rules files. To accomplish this, open the Options dialog by choosing the "Tools"->"Options" menu action. Then in the "Projects and Solutions" tab select the "VC++ Project Settings" sub-tab. Add the path to either etc\vc-8.0 (for VS 2005) or etc\vc-9.0 (for VS 2008) to the "Rule File Search Paths" field. Then press the Ok button to close this dialog. Alternatively, you can copy the .rules file into your solution directory and then include it into your project using the "Find Existing" button in the "Custom Build Rules" dialog described on the next step. This way your solution will be self-sufficient and can be built without modifications on another machine where XSD was installed in a different location.
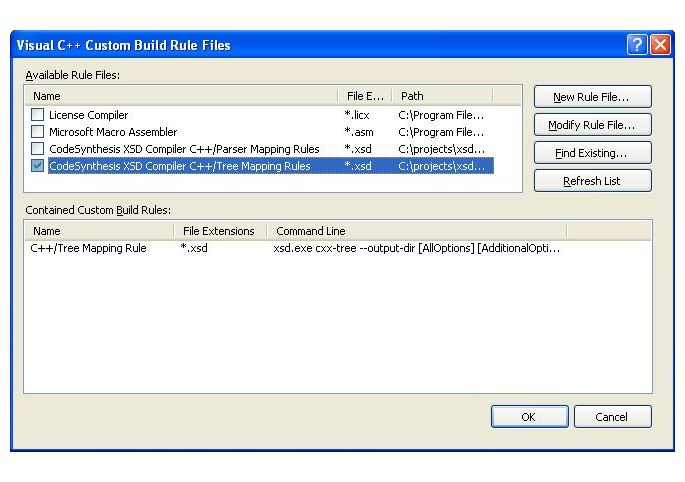
- Select the project where you want to add your schema and open the "Custom Build Rules" dialog by choosing "Project"->"Custom Build Rules" menu action. There your should see two rules for CodeSynthesis XSD: one is for C++/Tree and the other is for C++/Parser. Select the rule corresponding to the mapping you are planning to use in your project. Press the Ok button to close the dialog. For example:
- Add the schema file (for example, hello.xsd) to your project ("Project"->"Add Existing Item" menu action). At this point VS may add additional files (for example, hello.h) under the schema item. You can safely remove them from the project.
- Open the Properties dialog for the schema file (select the schema file in the Solution Explorer and choose "Project"->"Properties" menu action). There you will notice that the Tool field in the General tab contains the name of the C++ mapping that you have chosen.
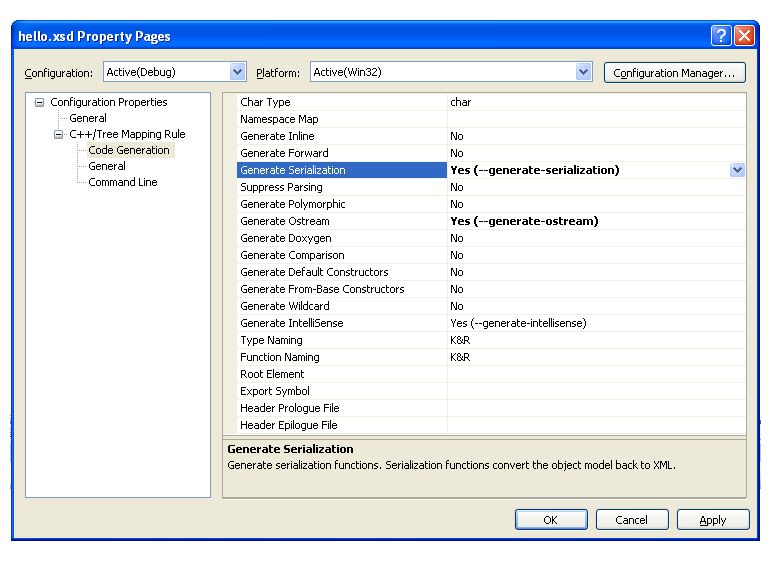
- In the same Properties dialog select the "C++/Tree Mapping Rule" or "C++/Parser Mapping Rule" tab. There you will see a number of sub-tabs where you can select various XSD compiler options, for example:
- Press the Ok button to close the Properties dialog.
- Compile the schema by selecting the schema file in the Solution Explorer and choosing "Build"->"Compile" menu action. This will result in the output files (for example, hello.hxx and hello.cxx) being created.
- Add the output files (for example, hello.hxx and hello.cxx) to the project ("Project"->"Add Existing Item" menu action).
- If your project is not linking to Xerces-C++ (or Expat, if you are using the C++/Parser mapping and have selected Expat as the underlying XML parser), you should add xerces-c_3.lib (release) or xerces-c_3D.lib (debug) (libexpat.lib for Expat) as Additional Dependencies in the Linker's Input tab. To accomplish this, select your project in Solution Explorer and choose "Project"->"Properties" menu action. Select the Linker tab, then Input sub-tab, and enter the library name into the Additional Dependencies field.


Visual Studio 201X (1X.0)
Note: the below information applies to Visual Studio version 2010 (10.0) and later (e.g, 2012 (11.0), 2013 (12.0), etc).
For Visual Studio 201X there are two ways to setup the XSD compilation step. You can use the same custom build step approach as in Visual Studio 2003. Additionally, you can use the rules-based approach of setting up the XSD compilation. This method relies on a set of build customization files (.targets, .props, and .xml) that are provided with the XSD distribution. These files specify the command line, output files, and options for the XSD compiler. They also provide the GUI-based presentation which allows you to configure the schema compilation process in a way similar to the built-in tools such as the C++ compiler and linker. The following step-by-step instructions show how to accomplish this:
- The build customization files are located in the etc\vc-1x.0 directory in the XSD distribution. The first step is to add this directory to the list of paths where Visual Studio looks for such files. To accomplish this, open the Options dialog by choosing the "Tools"->"Options" menu action. Then in the "Projects and Solutions" tab select the "VC++ Project Settings" sub-tab. Add the path to etc\vc-1x.0 to the "Build Customizations Search Path" field. Then press the Ok button to close this dialog. Alternatively, you can copy the build customization files into your solution directory and then include them into your project using the "Find Existing" button in the "Build Customization Files" dialog described on the next step. This way your solution will be self-sufficient and can be built without modifications on another machine where XSD was installed in a different location.
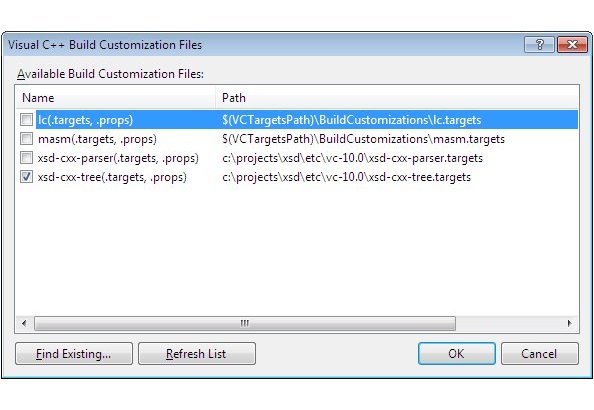
- Select the project where you want to add your schema and open the "Build Customization Files" dialog by choosing "Project"->"Build Customizations" menu action. There your should see two rules for CodeSynthesis XSD: xsd-cxx-tree for C++/Tree and xsd-cxx-parser for C++/Parser. Select the rule corresponding to the mapping you are planning to use in your project. Press the Ok button to close the dialog. For example:
- Add the schema file (for example, hello.xsd) to your project ("Project"->"Add Existing Item" menu action) and open its Properties dialog (select the schema file in the Solution Explorer and choose "Project"->"Properties" menu action). There you will notice that the Item Type field in the General tab contains the name of the XML Schema to C++ mapping that you have chosen.
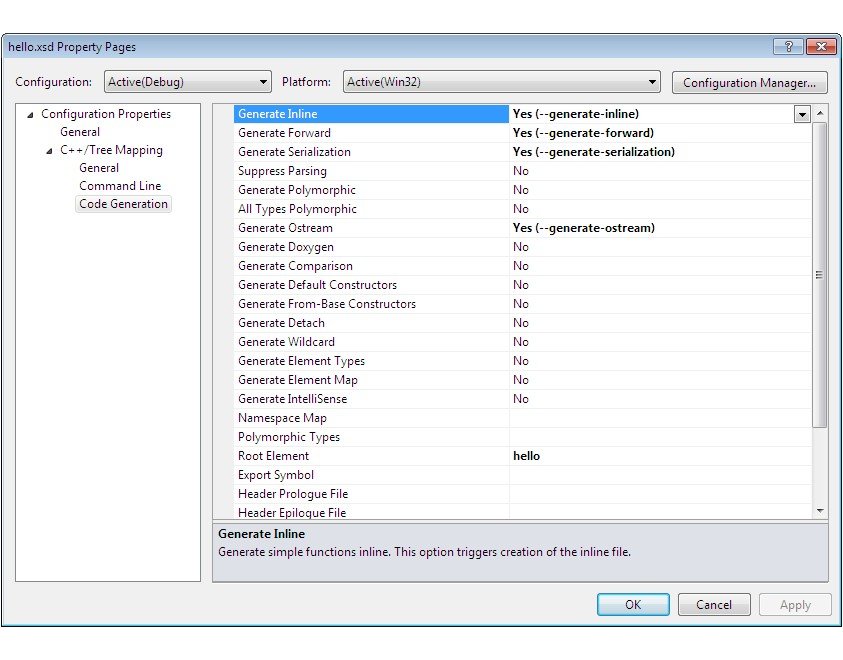
- In the same Properties dialog select the "C++/Tree Mapping" or "C++/Parser Mapping" tab. There you will see a number of sub-tabs where you can select various XSD compiler options, for example:
- Press the Ok button to close the Properties dialog.
- Compile the schema by selecting the schema file in the Solution Explorer and choosing "Build"->"Compile" menu action. This will result in the output files (for example, hello.hxx and hello.cxx) being created.
- Add the output files (for example, hello.hxx and hello.cxx) to the project ("Project"->"Add Existing Item" menu action).
- If your project is not linking to Xerces-C++ (or Expat, if you are using the C++/Parser mapping and have selected Expat as the underlying XML parser), you should add xerces-c_3.lib (release) or xerces-c_3D.lib (debug) (libexpat.lib for Expat) as Additional Dependencies in the Linker's Input tab. To accomplish this, select your project in Solution Explorer and choose "Project"->"Properties" menu action. Select the Linker tab, then Input sub-tab, and enter the library name into the Additional Dependencies field.


Conflict with Microsoft xsd.exe
Microsoft SDK contains an executable with the name xsd.exe which may take precedence over CodeSynthesis xsd.exe. If this happens you will get an error message like this:
xsd schema.xsd
Microsoft (R) Xml Schemas/DataTypes support utility
[Microsoft (R) .NET Framework, Version 2.0.50727.42]
Copyright (C) Microsoft Corporation. All rights reserved.
Error: invalid command line argument: 'cxx-tree'.
If you would like more help, please type "xsd /?".
Project : error PRJ0019: A tool returned an error code from "xsd schema.xsd"
If you get this error message then you need to make sure that the bin directory inside the CodeSynthesis XSD distribution is in the Visual Studio IDE's "Executable files" list and is at the top of this list. To check this:
- for Visual Studio .NET 2003/7.1 go to "Tools"->"Options"->"Projects"->"VC++ Directories"
- for Visual Studio 2005/8.0 go to "Tools"->"Options"->"Projects and Solutions"->"VC++ Directories"
- for Visual Studio 2008/9.0 go to "Tools"->"Options"->"Projects and Solutions"->"VC++ Directories"
- Then select "Executable files" in the drop-down list and make sure that the required path is present and is at the top of the list. If you are building the 64-bit version of your application, make sure that the "Platform" drop-down list shows
x64(Visual Studio keeps a separate set of paths for each platform). If you have made any modifications, restart Visual Studio.
- for Visual Studio 2010/10.0 and later:
- Open an existing or create a new C++ project
- Open the Property Manager view by selecting "View"->"Property Manager" (or "View"->"Other Windows"->"Property Manager") menu action
- Expand the property hierarchy for the project and find the Microsoft.Cpp.Win32.user property sheet
- Right click on Microsoft.Cpp.Win32.user and select the "Properties" menu action
- Select the VC++ Directories tab
- Make sure the required path is present and is at the beginning of the "Executable Directories" field (the paths are separated by semicolon)
Note (curtesy of Kent Bair): adding the value directly in front of the list of "Executable Directories" field will break compiling C++ code in all other versions of Visual Studio that you may have installed due to Visual Studio writing the value in the text box directly to %AppData%\..\Local\Microsoft\MSBuild\v4.0\Microsoft.Cpp.Win32.user.props which is shared by all versions starting from 10.0. However, if you select "Edit" and add the XSD path to the top of the list, Visual Studio will correctly change the value to [path-to-xsd]\bin;$(ExecutablePath).
- If you have made any modifications, click the Save button at the top of the Property Manager view and restart Visual Studio
- If you are building the 64-bit version of your application, repeat the above steps for the Microsoft.Cpp.x64.user property sheet (Visual Studio keeps a separate set of paths for each platform).
Creating a DLL
This section explains how to create a dynamically-linked library (DLL) from the generated code. It assumes that you are using the .rules file approach as presented in the previous section. You can also achieve the same result by using the custom build step method.
1. Create a DLL project, let's call it foo, and add the schema to it as explained in the previous section.
2. Create a header file, let's call it export.hxx, which contains the export symbol definitions:
#ifdef FOO_EXPORTS
#define FOO_SYMBOL_DECL __declspec(dllexport)
#else
#define FOO_SYMBOL_DECL __declspec(dllimport)
#endif
3. Open the Properties dialog for the schema file, select the Code Generation tab and enter FOO_SYMBOL_DECL into the Export Symbol field. Then select the Command Line tab and add --hxx-prologue "#include \"export.hxx\"" to the Additional Options field. Press the Ok button to close this dialog.
4. Rebuild the project.
If your schemas use XML Schema polymorphism in the form of substitution groups or xsi:type (and are therefore compiled with the --generate-polymorphic option) and you would like to place the generated code into several DLLs then your will need to use the --import-maps and --export-maps options as discussed in the XSD Compiler Command Line Manual.

