Using XSD with Microsoft Visual Studio
From Code Synthesis Wiki
| Revision as of 14:03, 3 February 2008 Boris (Talk | contribs) ← Previous diff |
Revision as of 14:05, 3 February 2008 Boris (Talk | contribs) Next diff → |
||
| Line 21: | Line 21: | ||
| # The .rules files are located in the etc\vc-8.0 and etc\vc-9.0 directories (for VS 2005 and 2008, respectively) in the XSD distribution. The first step is to add one of these directories to the list of paths where Visual Studio looks for .rules files. To accomplish this, open the Options dialog by choosing the "Tools"->"Options" menu action. Then in the "Projects and Solutions" tab select the "VC++ Project Settings" sub-tab. Add the path to either etc\vc-8.0 (for VS 2005) or etc\vc-9.0 (for VS 2008) to the "Rule File Search Paths" field. Then press the Ok button to close this dialog. | # The .rules files are located in the etc\vc-8.0 and etc\vc-9.0 directories (for VS 2005 and 2008, respectively) in the XSD distribution. The first step is to add one of these directories to the list of paths where Visual Studio looks for .rules files. To accomplish this, open the Options dialog by choosing the "Tools"->"Options" menu action. Then in the "Projects and Solutions" tab select the "VC++ Project Settings" sub-tab. Add the path to either etc\vc-8.0 (for VS 2005) or etc\vc-9.0 (for VS 2008) to the "Rule File Search Paths" field. Then press the Ok button to close this dialog. | ||
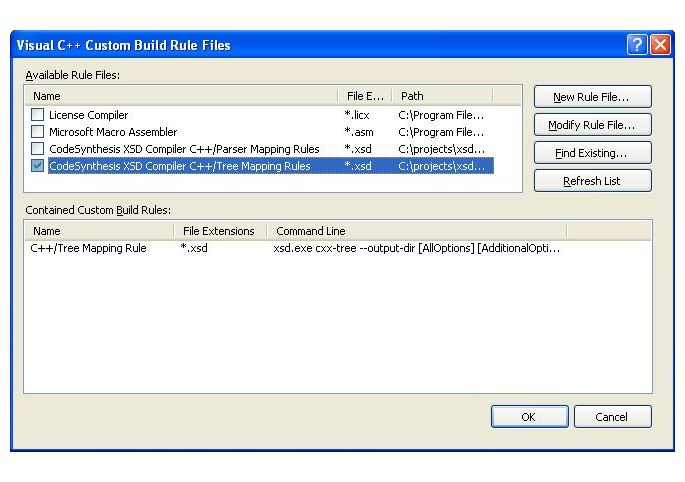
| - | # Select project where you want to add your schema and open the "Custom Build Rules" dialog by choosing "Project"->"Custom Build Rules" menu action. There your should see two rules for CodeSynthesis XSD: one for C++/Tree and the other is for C++/Parser. Select the rule corresponding to the mapping you are planning to use in your project. Press the Ok button to close the dialog. For example:<br/> [[Image:Xsd-custom-build-rules-vc80.jpg|Visual Studio 8.0 Custom Build Rules dialog screenshot]] | + | # Select the project where you want to add your schema and open the "Custom Build Rules" dialog by choosing "Project"->"Custom Build Rules" menu action. There your should see two rules for CodeSynthesis XSD: one for C++/Tree and the other is for C++/Parser. Select the rule corresponding to the mapping you are planning to use in your project. Press the Ok button to close the dialog. For example:<br/> [[Image:Xsd-custom-build-rules-vc80.jpg|Visual Studio 8.0 Custom Build Rules dialog screenshot]] |
Revision as of 14:05, 3 February 2008
Note: this page is a work in progress and is based on the upcoming XSD 3.1.0
This page describes various ways of integrating the XSD compiler with the Microsoft Visual Studio IDE as well as other Visual Studio-specific topics.
Visual Studio .NET 2003 (7.1)
A common way of integrating the XSD compilation step in Visual Studio (VS) 7.1 is with the custom build steps. With this method you add the schema file to your project and specify the command line to compile it as well as the output files. When the project is built, VS IDE will check if the output files do not exist or out-of-date compared to the schema file and will execute the specified command line in order to regenerate them. The following step-by-step instructions show how to acomplish this:
- Add the schema file (for example, hello.xsd) to your project ("Project"->"Add Existing Item" menu action). At this point VS assumes that you are going to use Microsoft xsd.exe tool and will try to compile the schema which may fail. This is ok. You may also find that additional files (for example, hello.h) were added under the schema item. You can remove all of them.
- Open the Properties dialog for the schema file (select the schema file in the Solution Explorer and choose "Project"->"Properties" menu action).
- In the Properties dialog select the General tab and choose "Custom Build Tool" for the Tool field. Then press the Apply button.
- In the same Properties dialog select the "Custom Build Step" tab. There you will have the "Command Line", "Description", "Outputs", and "Additional Dependecies" fields. Fill them depending on how you want to compile your schema, for example:
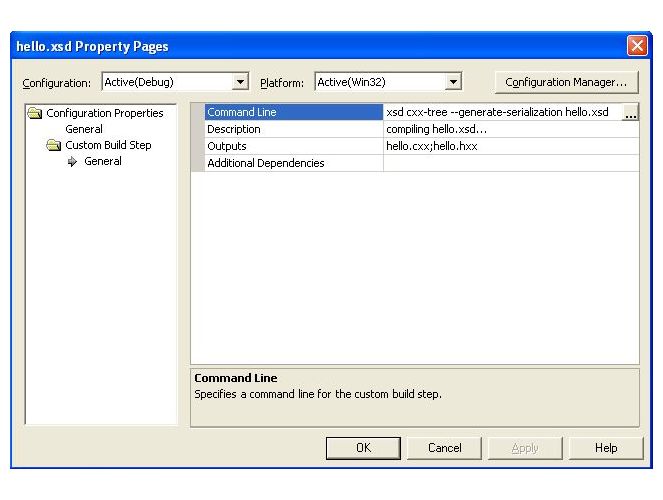
- Press the Ok button to close the Properties dialog.
- Compile the schema by select the schema file in the Solution Explorer and choosing "Build"->"Compile" menu action. This will result in the output files (for example, hello.hxx and hello.cxx) being created.
- Add the output files (for example, hello.hxx and hello.cxx) to the project ("Project"->"Add Existing Item" menu action).

Visual Studio 2005 (8.0) and 2008 (9.0)
For Visual Studio 2005 and 2008 there are two ways to setup the XSD compilation step. You can use the same custom build step approach as in Visual Studio 2003. Additionally, starting from Visual Studio 2005, you can use the rules-based approach of setting up the XSD compilation. This approach relies on the .rules files that are provided with the XSD distributions. These files specify the command line, output files, and options for the XSD compiler. They also provide the GUI-based presentation which allows you to configure the schema compilation process in way similar to the built-in tools such as the C++ compiler and linker. The following step-by-step instructions show how to acomplish this:
- The .rules files are located in the etc\vc-8.0 and etc\vc-9.0 directories (for VS 2005 and 2008, respectively) in the XSD distribution. The first step is to add one of these directories to the list of paths where Visual Studio looks for .rules files. To accomplish this, open the Options dialog by choosing the "Tools"->"Options" menu action. Then in the "Projects and Solutions" tab select the "VC++ Project Settings" sub-tab. Add the path to either etc\vc-8.0 (for VS 2005) or etc\vc-9.0 (for VS 2008) to the "Rule File Search Paths" field. Then press the Ok button to close this dialog.
- Select the project where you want to add your schema and open the "Custom Build Rules" dialog by choosing "Project"->"Custom Build Rules" menu action. There your should see two rules for CodeSynthesis XSD: one for C++/Tree and the other is for C++/Parser. Select the rule corresponding to the mapping you are planning to use in your project. Press the Ok button to close the dialog. For example: